
Page Contents
How To Adjust Pressure On Instant Pot
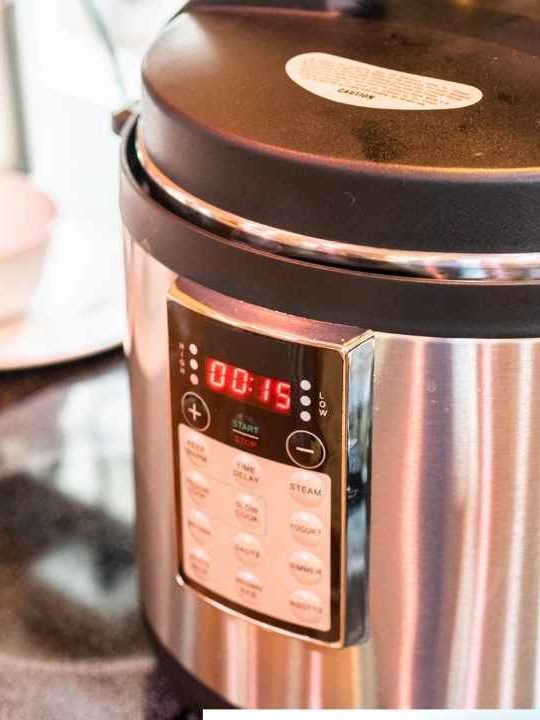
To adjust the pressure on the instant pot, first, turn the instant pot on. Next, press the Pressure Cooker or Manual button. Then, using the +/- buttons, adjust the cooking time. Press the Pressure level button and adjust it to high, medium, or low.
Steps to take:
- Toggle between high-pressure and low-pressure cooking methods
- Timer button / Delay start button – Set a timer for delayed cooking (up to 24 hours)
- Quick rice button Preset settings With the low-pressure cooking method
The pressure cooking time will be based on the inside of the pot, and the amount of rice and water is automatically adjusted. When you select the “Rice” button, the cooking time will automatically adjust based on the amount of food you put in the Instant Pot and cook at low pressure. The default setting is low-pressure cooking for 12 minutes, which is suitable for slightly larger rice grains.
For example, the SOUP button defaults the pressure cooker to 30 minutes at HIGH pressure, which you can use to cook any food that requires a lot of time and effort. If you’re cooking a pressure cooker recipe on an electric stove, you’ll likely need to add 25 percent more pressure time. You must keep in mind that you will need time to release the pressure at the end of cooking.
- Then set the desired pressure cooking time by pressing the button up or down to increase or decrease the cooking time.
You can adjust the cooking time as needed, usually 20 to 40 minutes, and low or high pressure. This means you can use the “manual” button to do the same cooking by adjusting the pressure level and cooking time.
| Step | Instructions |
|---|---|
| 1. | Turn on the Instant Pot. |
| 2. | Press the Pressure Cooker or Manual button. |
| 3. | Adjust the cooking time using the +/- buttons. |
| 4. | Press the Pressure level button. |
| 5. | Select the desired pressure level: High, Medium, or Low. |
| 6. | Let the Instant Pot cook according to the set time and pressure. |
We like to use the “Manual” (or “Pressure Cook” on newer models) button for more precise control over how and when to cook based on factors like meat cuts, food size, or containers. It is prepared in it. Most programs or smart buttons simply set the Instant Pot to high or low pressure for specific periods that are more closely related to the food being cooked.
The settings button can also help you know if the pot will be locked to trap steam in pressure cooking mode or if you’ll be using the Instant Pot like a regular pot or a slow cooker without pressure cooking. Cook time 30 minutes on high pressure.
For approximately 5-25 minutes, the multicooker will switch to “keep warm” mode, where the food can continue to cook as the pressure is released. Once you’ve cut and fried everything (and even set the table), the brown rice will complete its cooking cycle, the pressure will drop naturally, and the instant pots will automatically switch to Keep-Warm. So your perfectly cooked rice is patiently waiting for you at the perfect temperature. filing.
Select the cooking function and adjust the time/pressure, then press the timer and use the [+] and [-] buttons to set the waiting time before the Instant Pot starts cooking. To use the delay, simply press the timer button and hold the pressure/manual button or slow cook button for 10 seconds. Press the “Pressure Cooker” or another preset program, then press the “Timer” and adjust the delay time by pressing the “+” or “-” button.
You can adjust the pressure, temperature, and time by selecting the “+/-” buttons. This button helps you choose between Normal (default), Plus, or Minus for the extinguishing mode depending on the desired temperature. If you click “Meat and Stew Setting” again, you can change the mode from “Normal” to “Less” or “More” (this will just change the cooking time).
Set the “Sear” button to “less” for stewing, “normal” for browning, and “more” for browning. Sauté button Use this button to sear, brown, or stew directly in the pot with the lid open. Press the Sauté button to brown the meat, sauté the vegetables, and bring the ingredients to a boil in the pressure cooker.
On Smart, you can use the “Setting” button to decrease or increase the keep the warm temperature from 145 degrees (normal) to 133 degrees (minus) and 167 degrees (plus). Used to prepare yogurt in pots or individual jars.
Use the Fry button. Fry in a pressure cooker with the lid closed. Set a custom pressure level and cooking time using the Adjust and [+] or [-] buttons. Press the soup and the “Adjust” button twice (less often) to cook for 20 minutes. Cooking time under high pressure is 35 minutes.
Press the adjustment button to change to the Minus setting for 20 minutes of cooking or the Plus setting for 45 minutes of cooking. Cooking time under high pressure is 30 minutes. Use the “+” and “-” buttons to increase or decrease the cooking time. Switch between low and high pressure. Use this button to cancel a function or turn off the pressure cooker. Ten seconds after no buttons are pressed, the kitchen will beep and the kitchen will start cooking.
It usually takes about ten minutes to reach cooking pressure but will vary depending on the size of the pan, the amount of food in it, and the temperature of the food and liquid you put in it.
If you want dinner to be ready in 2 hours, but the recipe calls for 20 minutes to build pressure, 20 minutes to cook, and 20 minutes to release pressure, set the timer to only 1 hour so that the cooking process starts at 1 hour and 2 hours it will Finish. If the recipe says the food should be ready in 20 minutes, add another 20 minutes or so to the scheduled serving time.
Recipes that require a low-pressure setting can use pressure cooking, but the cooking time for the recipe will be reduced. You can press the Keep Warm/Cancel button at any time to cancel cooking and return to standby mode.
How to Set Instant Pot to Low Pressure?
Switch on the Instant Pot and press the Pressure Cook button by using the +/- keys. Adjust the pressure level by pressing the pressure button. The basic settings will be Normal mode on High Pressure. By pressing the Cook button again it will switch from Normal mode to Less or More. Low- Pressure settings are used for cooking delicate food.
How to set Instant Pot to high pressure on Manual?
To set instant pot to high pressure on manual just press the manual or pressure cook button and see if it shows high in the display. If it does not keep on pressing the button until it shows high. Then adjust the time through the plus and minus buttons and let it cook.